Tired of refrigerant leaks causing repeat callbacks and inefficient HVAC systems? Finding those elusive leaks quickly and accurately is a constant challenge for technicians. I've spent years honing these skills.
The "best" HVAC leak detection method often involves a combination of techniques, starting with simple observations and progressing to specialized tools, tailored to the specific leak scenario for optimal accuracy and efficiency.
Refrigerant leaks are a persistent gremlin in the HVAC world. They don't just result in poor cooling performance; they can cause significant damage to system components, lead to wasted energy, and have detrimental effects on our environment. Throughout my career, I've learned that there isn't a single, magical tool or technique that will uncover every type of leak in every situation. Different circumstances demand different approaches. Sometimes a leak is glaringly obvious, presenting itself with clear signs. Other times, it’s a minuscule, intermittent escape that plays a frustrating game of hide-and-seek. The real key to success lies in adopting a systematic methodology and possessing a thorough understanding of the strengths, weaknesses, and appropriate applications of each available detection method. Let's explore these tools and strategies to transform you into a more effective and efficient leak detective.
What Are the First Steps in Detecting an HVAC Refrigerant Leak?
A suspected refrigerant leak often leaves technicians wondering where to even begin their search. Pinpointing the origin of a leak within a complex HVAC system necessitates a methodical, step-by-step approach, starting with fundamental checks.
The initial steps in detecting an HVAC leak involve a thorough visual inspection for tell-tale signs like oil stains, listening for hissing sounds, and often using a simple soap bubble solution on suspected joints and connections to confirm active leakage.
When I'm called to a system suspected of leaking refrigerant, my diagnostic process always kicks off with the basics. Before I even think about reaching for my advanced electronic tools, I conduct a comprehensive visual inspection. I'm looking for those classic indicators of a refrigerant leak, primarily oil residue. Since the refrigerant carries oil throughout the system, any point where refrigerant escapes will likely show traces of oil. This oil attracts dust and dirt over time, creating distinctive greasy, dark, or wet-looking patches. I pay particularly close attention to common culprits: flare fittings, Schrader valve cores (those little access ports), the U-bends in evaporator and condenser coils, service valves, and any brazed or welded joints.
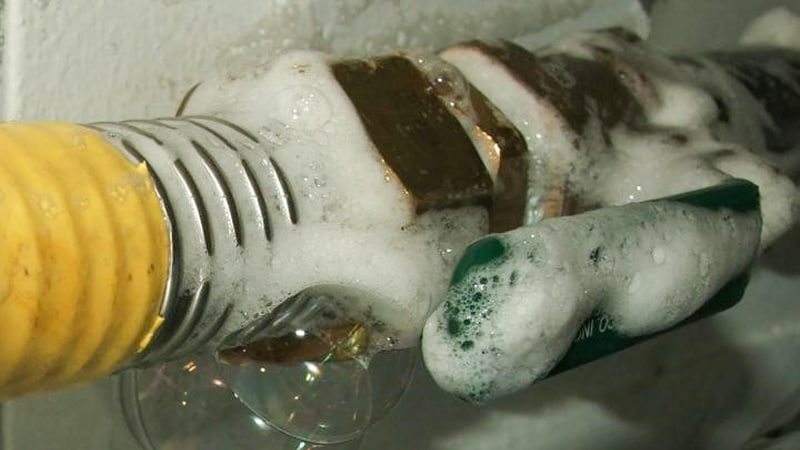
If my visual scan highlights a suspicious area, or even if it doesn't and I just want to check high-probability spots, my next immediate tool is often a simple bottle of high-quality leak detection bubble solution. Applying this solution to a suspected joint or connection will quickly reveal if gas is escaping by forming visible bubbles. This method is incredibly cost-effective, straightforward, and surprisingly adept at pinpointing many leaks, especially those that are moderate to large in size. It provides instant visual confirmation. Only after these initial steps do I typically escalate to more sophisticated detection methods if the leak remains elusive. This foundational approach ensures I don't overlook the obvious and often saves a lot of time.
Initial Leak Detection Checklist:
- Gather System History:
- I always start by asking the customer about previous repairs, the age of the system, and when cooling issues were first noticed. This background information can provide valuable clues about potential weak points or recurring problems.
- Thorough Visual Inspection:
- Next, I meticulously look for oil stains or any unusual residue on all accessible refrigerant lines, coils, fittings, and around the compressor.
- I also check for signs of physical damage, corrosion, or improperly made connections that could compromise the system's integrity.
- Examining Schrader valve caps for tightness and any signs of leakage from the valve core itself is also a key part of this visual check.
- Audible Check (if safe and system is running or pressurized):
- Sometimes, especially in quieter environments, you can actually hear a leak. I listen carefully for any hissing sounds that might indicate escaping gas.
- Bubble Test on Suspect Areas:
- If I find oily spots or have other reasons to suspect a particular joint, I'll apply a quality leak detection fluid. Observing for bubble formation provides direct visual evidence of a leak point.
| Initial Step | Key Focus | Why It's Important |
|---|---|---|
| Visual Clues | Oil stains, corrosion, physical damage to components. | Often the quickest way to identify larger or obvious leaks. |
| Audible Clues | Hissing sounds indicating gas escape. | Can sometimes guide you to a leak area in quiet conditions. |
| Bubble Test | Confirming leaks at specific joints/connections. | Provides direct visual evidence of a leak point. |
| System Symptoms | Poor cooling, frequent cycling, ice on evaporator. | These symptoms often point towards refrigerant loss. |
Electronic Leak Detectors: How Do They Work and Which Type is Right for Me?
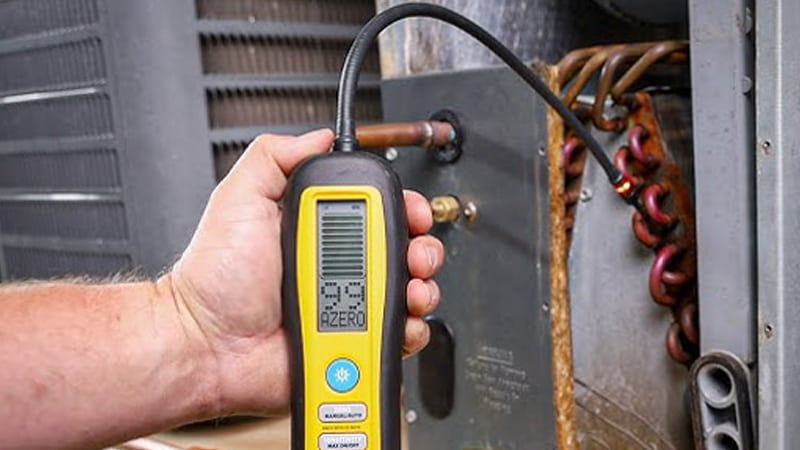
When basic checks don't reveal the source of an HVAC leak, electronic detectors become essential. Understanding the different technologies behind these powerful tools is crucial for selecting the right one and using it effectively to find those harder-to-locate leaks.
Electronic leak detectors utilize various sensor technologies—such as heated diode, infrared, or ultrasonic—to identify the presence of refrigerant gases. Heated diode and infrared types are common for specific refrigerants, while ultrasonic technology detects the sound signature of any gas leak.
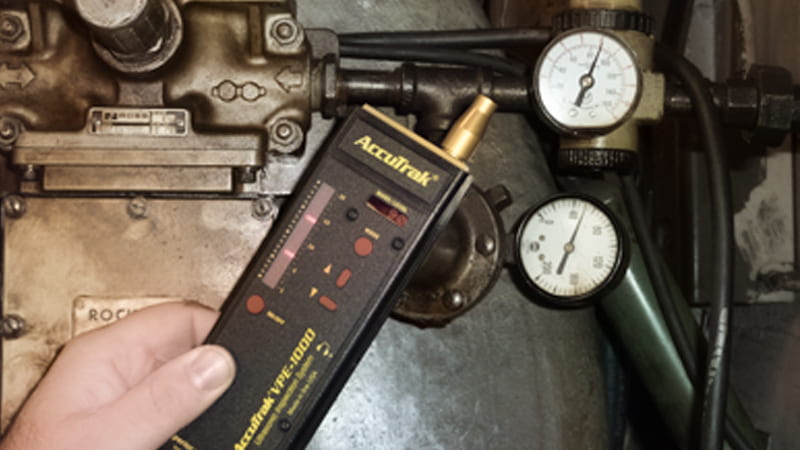
Once I've completed my initial visual and bubble tests, or if I suspect a very small, elusive leak, my next step is to deploy an electronic leak detector. These devices are truly indispensable for efficiently scanning larger surface areas and for their remarkable ability to sense refrigerant concentrations far too low to be detected by eye or with a simple bubble solution. There are several main types available, and over my ten years in the industry, I've had the chance to work with all of them. Heated Diode (or Heated Sensor) detectors are very common and have been a staple for many technicians. They operate by passing ambient air over a specially treated, heated ceramic element. When refrigerant gas encounters this hot element, it undergoes a chemical breakdown. This breakdown process changes the electrical current flowing through the sensor, which in turn triggers an alarm, alerting the technician to the presence of refrigerant. They offer excellent sensitivity for most common refrigerants, but a drawback is that their sensors can become "poisoned" or desensitized by exposure to very high concentrations of refrigerant or certain other volatile organic compounds (VOCs) sometimes found on job sites. The sensor element itself also has a finite lifespan, typically requiring replacement every year or two with regular professional use.
Infrared (IR) detectors represent a more advanced and, in my opinion, often more reliable technology. These units employ an optical sensor that identifies refrigerants by observing how they absorb infrared light at specific wavelengths known to be characteristic of refrigerant molecules. The significant advantages of IR detectors include a much longer sensor life—often lasting for the entire operational life of the instrument. They are also notably less prone to false alarms from other background chemicals and generally maintain their calibration and sensitivity more consistently over time. While their initial purchase price is usually higher than heated diode models, the reduced lifetime cost of ownership (due to no frequent sensor replacements) and their enhanced reliability often make them a superior long-term investment for busy HVAC professionals.
Ultrasonic leak detectors operate on a completely different principle. They don't "sniff" for specific chemical gases. Instead, they are designed to "listen" for the high-frequency sound (ultrasound, typically in the 35-45 kHz range) that is generated by gas escaping from a system under pressure and passing through a small orifice (the leak). This makes them incredibly versatile, as they can detect leaks of any gas type, including air or nitrogen, which is very useful when pressure testing. They are also unaffected by wind or high concentrations of refrigerant in the ambient air, which can be problematic for sniffer-type detectors. However, they are generally best for pinpointing leaks once you are relatively close to the source and may not be as effective for detecting very slow, seeping leaks that don't produce enough turbulent sound.
Choosing Your Electronic Detector:
- Heated Diode/Sensor:
- Pros: These detectors generally offer very good sensitivity to a wide range of common refrigerants. They are also relatively affordable compared to some other technologies, making them an accessible option for many technicians. They are widely available from numerous manufacturers.
- Cons: The primary drawback is the sensor's limited lifespan; it typically needs replacement every 100-300 hours of use or annually/bi-annually. They can also be prone to false alarms if exposed to other job-site chemicals or if overwhelmed by a very large refrigerant leak.
- Infrared (IR):
- Pros: IR detectors boast excellent sensitivity, often matching or exceeding heated diode models. Their standout feature is the very long sensor life, frequently lasting 5 years or even the lifetime of the detector, which significantly reduces ongoing costs. They are also highly resistant to false alarms from background contaminants and recover quickly from exposure to high refrigerant concentrations.
- Cons: The main disadvantage is their higher initial purchase price compared to heated diode models.
- Ultrasonic:
- Pros: A key advantage is their ability to detect any type of pressurized gas leak, not just refrigerants. They are not affected by wind or existing refrigerant saturation in the air, making them useful in challenging environments. With headphones, they can be effective even in noisy areas.
- Cons: Their effectiveness depends on the leak producing sufficient turbulent sound, so they may not detect very small, low-pressure, or laminar (smooth) flow leaks. They typically require a reasonable pressure differential across the leak site.
| Detector Technology | Typical Sensitivity | Sensor Lifespan | Immunity to Contaminants | Primary HVAC Use Case |
|---|---|---|---|---|
| Heated Diode | Very Good (<0.1 oz/yr) | 1-2 Years | Moderate | General purpose refrigerant leak detection, good value. |
| Infrared (IR) | Excellent (<0.1 oz/yr) | 5+ Years | High | High-reliability, low false alarm, long-term professional use. |
| Ultrasonic | Varies with pressure | N/A (Transducer) | Very High | Pinpointing leaks in noisy areas, any gas type, pressure/vacuum tests. |
Beyond Electronics: When Are Dye, Bubbles, or Nitrogen Tests the Best Choice?
While electronic detectors are invaluable assets in an HVAC technician's toolkit, certain situations call for alternative or supplementary methods. Understanding when to deploy fluorescent dye, bubble solutions, or nitrogen pressure tests can significantly improve your leak-finding success rate.
Methods like fluorescent dye excel for pinpointing very tiny or intermittent leaks that might evade electronic sniffers. Bubble solutions offer definitive visual confirmation for accessible leaks identified by other means. Nitrogen pressure tests are indispensable for verifying the integrity of repairs and for locating leaks when the system is empty of refrigerant or when electronic detection proves challenging.
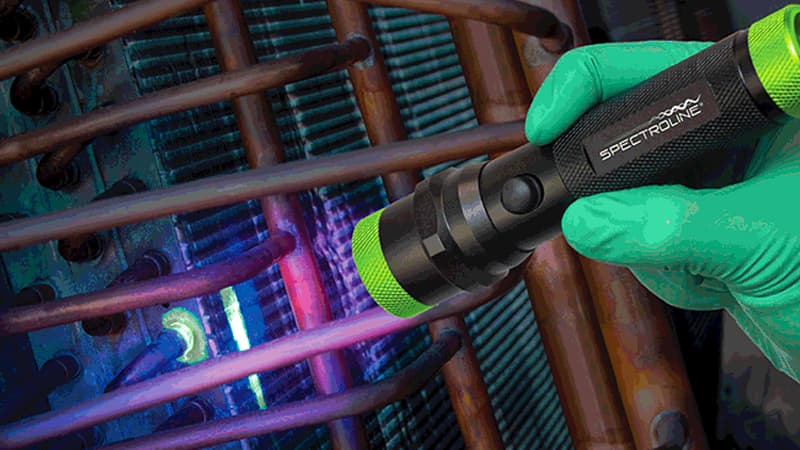
As much as I rely on my trusty electronic leak detectors, I know from over a decade of experience that they aren't always the final answer. There are absolutely scenarios where other methods shine or are even necessary. Fluorescent dye is a particularly potent tool when I'm up against those really stubborn, intermittent leaks – the kind that only seem to appear under specific operating temperatures or pressures, or for very minuscule leaks that are below the reliable detection threshold of some electronic sniffers. The process involves carefully introducing a small, precise amount of UV-detectable dye into the system's refrigerant. After the system has been allowed to run for an adequate period (this could be a few hours or, for very slow leaks, even a few days), allowing the dye to thoroughly circulate with the refrigerant and oil, I then meticulously scan the entire system with a specialized UV flashlight. Any point where refrigerant (and thus the dye-laden oil) is escaping will glow brightly, often a vibrant yellow or green, making it unmistakably easy to spot. The main considerations with dye are that it requires adding a substance to the system, and there's a necessary waiting period for the dye to circulate effectively.
Bubble solutions, as I've mentioned, remain a fundamental and incredibly useful tool. They are my go-to for visually confirming a suspected leak once an electronic detector has led me to a general area, or for quickly and definitively checking accessible components like flare nuts, service valve packings, or Schrader cores. There's a certain straightforward satisfaction in seeing those bubbles form and grow – it’s undeniable proof of a leak. And then there's nitrogen pressure testing. This is an absolutely indispensable part of professional HVAC service, particularly after performing a repair or when installing a new system. After recovering any existing refrigerant, I will isolate the system (or the section I've worked on) and pressurize it with dry nitrogen, often to a pressure specified by the manufacturer or appropriate for the system components. This allows me to listen for larger leaks, use bubble solutions extensively over all joints and connections without releasing any refrigerant, and, most importantly, perform a standing pressure test. If the system holds the nitrogen pressure steady for an extended period (for example, several hours or even overnight, depending on the criticality), it provides strong confirmation that the system is tight. If the pressure drops, I know a leak still exists, and I can then use my other tools, like bubble solution or an ultrasonic detector, to find it while it's under nitrogen pressure, which is often easier than when it's under a deep vacuum.
When to Use Non-Electronic & Specialized Methods:
- Fluorescent Dye & UV Light:
- Best for: This method really shines when you're dealing with very small leaks that are difficult to pinpoint (often referred to as seepage), or for those frustrating intermittent leaks that only occur under specific operating conditions and are hard to replicate on demand. It's also excellent for finding multiple tiny leaks across a large component like an evaporator or condenser coil.
- Considerations: It's important to remember that this method is invasive, as you are adding dye to the refrigerant and oil system. You must allow sufficient time for the dye to circulate thoroughly with the oil. There has been some industry debate about the potential long-term effects of dye on system components if it's overused or if an incompatible type of dye is chosen, so always use high-quality, OEM-approved dyes sparingly.
- Bubble Solution:
- Best for: I find bubble solution most effective for visually confirming suspected leaks at specific, accessible points, especially after an electronic detector has narrowed down the general area. It's perfect for checking flare nuts, valve stems, and threaded connections.
- Considerations: While effective, it can be a bit messy. It's not practical for scanning very large surface areas or for leaks in inaccessible locations. Wind can also make it difficult to see small bubbles forming outdoors.
- Nitrogen Pressure Testing (with or without tracer gas):
- Best for: This is a cornerstone for verifying system integrity after any repairs that involve opening the refrigerant circuit, or before charging a newly installed system. It's also the primary method for finding leaks when the system is completely empty of refrigerant. Furthermore, pressurizing with nitrogen allows for the effective use of ultrasonic leak detectors or extensive bubble solution application over the entire system without releasing any harmful refrigerants.
- Considerations: This process requires the recovery of any existing refrigerant charge before pressurization. You'll also need a cylinder of dry nitrogen and a suitable pressure regulator. Using a trace amount of refrigerant (like R-22 in an R-22 system, where permissible) or a specific tracer gas with nitrogen can allow electronic sniffers to be used during the pressure test.
| Method | Primary Strength | Ideal Scenario | Limitation |
|---|---|---|---|
| Fluorescent Dye/UV | Finds tiny/intermittent leaks, visual confirmation. | Elusive leaks, confirming multiple leak sources over time. | Invasive (adds dye), time delay for circulation. |
| Soap/Bubble Solution | Simple, inexpensive, direct visual pinpointing. | Accessible joints, flare fittings, valve stems. | Not for large areas, affected by wind, may miss tiny leaks. |
| Nitrogen Pressure Test | Confirms system tightness, allows non-refrigerant leak finding. | Post-repair verification, pre-charge check, finding leaks without refrigerant. | Requires recovery, nitrogen supply. |
| Ultrasonic (with Nitrogen) | Detects sound of any pressurized gas, good in noisy areas. | Locating leaks during nitrogen pressure test. | May not find very slow, non-turbulent leaks. |
Developing a Pro-Level Strategy: Combining Methods for Tackling Tough Leaks?
For those truly stubborn HVAC leaks that seem to defy your standard detection methods, a more advanced, multi-faceted strategy is often required. A single tool might not be sufficient, necessitating a well-thought-out combination of techniques to finally uncover the hidden culprit.
When faced with tough HVAC leaks, a professional strategy involves systematically combining various detection methods. This often starts with a nitrogen pressure test and a standing vacuum test to confirm the leak's existence. Then, an electronic detector (or ultrasonic detector if still under nitrogen pressure) is employed, followed by fluorescent dye if the leak remains elusive. Meticulously isolating system sections can also be crucial to narrow down the search.
When I encounter a particularly challenging leak—perhaps one that only manifests under specific operational loads, varying temperatures, or is incredibly small—I know it's time to shift from routine checks to a more comprehensive, strategic mode of attack. It's no longer about relying on a single tool; it's about orchestrating a sequence of tests and using different methods in a logical progression to effectively corner and identify the leak. My initial objective in these situations is always to definitively confirm that a leak actually exists and, if possible, get a rough assessment of its general size or rate. This usually involves a meticulous process: first, recovering any refrigerant remaining in the system, then performing a thorough nitrogen pressure test. I'll pressurize the system to an appropriate level and let it stand, monitoring for any pressure drop over a significant period. Following this, I'll evacuate the system to a deep vacuum (500 microns or less) and perform a standing vacuum test, carefully watching the micron gauge for any rise in pressure, which indicates leakage or remaining moisture. If both these tests clearly point to a leak, then the intensive hunt truly begins.
If the nitrogen pressure test indicated a noticeable pressure drop, I would then typically use an ultrasonic leak detector while the system is still pressurized with nitrogen, listening for the characteristic hiss of escaping gas. Alternatively, if I had introduced a small amount of tracer gas with the nitrogen, I would use a highly sensitive electronic detector specifically calibrated for that tracer. However, if the leak is extremely small and only becomes apparent through a very slow vacuum decay during the standing vacuum test, this is precisely when fluorescent dye becomes an invaluable ally. In such cases, I would carefully add the correct type and amount of UV-detectable dye to the system. After doing so, I would then recharge the system with the appropriate refrigerant (once I've confirmed the system can hold at least some pressure safely). I'd allow the system to operate for a sufficient period—ranging from a few hours to even a couple of days for the most minute leaks—to ensure the dye has fully circulated with the oil. Then, I'd return to meticulously scan all components with a powerful UV flashlight, looking for that tell-tale glow.
System isolation is another critical tactic in these advanced troubleshooting scenarios. For instance, if I suspect the leak is located within the indoor unit, I might use service valves or even temporarily braze off sections to isolate the indoor coil and air handler from the outdoor unit and the connecting line set. I would then pressure test or vacuum test each isolated section independently. This methodical process of elimination significantly narrows down the search area. It undoubtedly requires patience, meticulous attention to detail, and a logical approach, but combining these advanced techniques almost always leads to the successful identification of even the most stubborn and well-hidden leaks.
Advanced Leak Detection Strategy Components:
- Verification & Quantification of Leak Rate:
- Before investing significant time in a detailed search, it's crucial to use nitrogen pressure decay tests (monitoring pressure drop over a set time) and standing vacuum decay tests (monitoring micron rise over time). This not only confirms the leak's presence but also gives a qualitative idea of its size, which can guide the choice of subsequent detection methods.
- Systematic Isolation Techniques:
- For complex systems or when leaks are particularly hard to find, systematically dividing the HVAC system into smaller, independently testable sections is key. This might involve using existing service valves to isolate components like the indoor coil, outdoor coil, or specific sections of the line set. In some cases, for very precise isolation, temporarily pinching off lines (with appropriate tools) or even cutting and brazing caps to seal off sections might be necessary, followed by individual pressure or vacuum testing of each isolated segment.
- Utilizing Tracer Gases with Specialized Detectors:
- When dealing with extremely small leaks or in environments with high background refrigerant levels, introducing a small percentage of a non-native tracer gas (like helium, or a specific HFC/HFO blend designed as a tracer) along with the dry nitrogen during a pressure test can be highly effective. This allows the use of highly sensitive electronic leak detectors that are specifically calibrated to that particular tracer gas, minimizing false positives from ambient refrigerant.
- Patience, Meticulousness, and Varying Conditions:
- Some leaks are notoriously fickle, only appearing under certain operating temperatures, pressures, or when the system is subject to vibration. Successfully finding these often requires patience and the willingness to meticulously re-check areas under different conditions. This might involve running the system through various cycles, carefully applying localized heat or cooling (while observing safety precautions), or gently manipulating components to see if a leak can be induced or made more apparent.
| Strategy Element | Purpose | Tools/Techniques Involved |
|---|---|---|
| Confirm & Characterize | Prove a leak exists; estimate its severity. | Nitrogen pressure test, standing vacuum test, micron gauge. |
| Isolate & Conquer | Narrow down the search area to a specific section/component. | Service valves, pinch-off tools, brazing (for temporary isolation). |
| Enhance Detectability | Make very small or intermittent leaks easier to find. | Fluorescent dye & UV light, specific tracer gases. |
| Vary Conditions | Find leaks that only appear under certain pressures/temps. | Running the system, applying heat/cold (carefully), vibration. |
Final Thoughts
The best HVAC leak detection often combines visual checks with electronic sniffers. For persistent issues, a strategic mix including dye or ultrasonic methods, alongside systematic isolation, will usually uncover even the most elusive refrigerant leaks.